Virtual Machines
Terrascope offers its users a Virtual Machine (VM) service for free. Users can use a Virtual Research environment, with access to the available data archives and robust toolset and libraries for further data exploration and analysis. Users can also develop, debug, and test Python, or Java applications in these VMs.
The VM includes:
- Several pre-installed command-line tools.
- Desktop applications.
- Developer tools (e.g., GDAL, QGIS, ESA SNAP, Octave, Python). These tools can be helpful for data exploration.
The target users are researchers developing applications with Terrascope data. After prototyping, they can upscale applications using the Terrascope processing environment, aiming to run them on the Terrascope Hadoop cluster.
User VMs must comply with the Terrascope networking policy.
Applying for a VM
To apply for a VM, users need to have a Terrascope account. If an account is not available, users can create one on the Terrascope portal. More registration information can be found in the here.
Once signed in, users can request a VM using this form. After receiving the request, the Terrascope team will validate it and provide the user with a VM within two working days.
An email will be sent to the user explaining how to access the VM. The VM has a standard configuration of 4 CPU cores, 8GB RAM, 4GB SWAP, and 80GB disk storage. Users can contact the Terrascope team at eoplaza@terrascope.be if additional resources are needed.
By requesting a VM, a user also agrees with the VM policy.
Accessing the VM
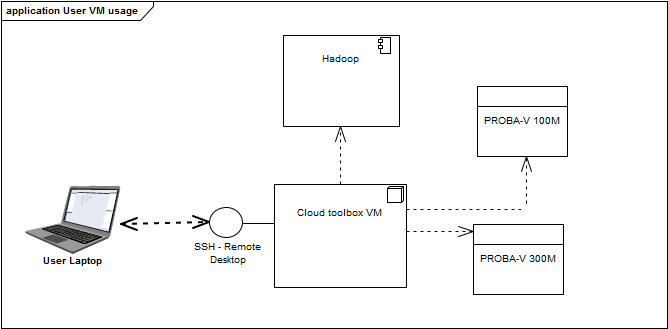
Users can access their VM in two methods:
- command-line access.
- graphical VM desktop access
Both methods can be configured to use Terrascope credentials or ssh-key authentication, with the latter being preferred for security reasons.
Refer Figure 1 for a schematic presentation.
Accessing the VM via command line
For command line access, use Secure Shell (SSH). Install an SSH client (e.g., PuTTY for Windows) if necessary.
On Linux, use the command:
ssh -p port username@uservm.terrascope.be
If an SSH connection terminates or ‘hangs’ after a while, resolve this by adjusting local SSH settings. Adding ServerAliveInterval 60 to the ~/.ssh/config file ensures the client sends a keep-alive packet to the server every 60 seconds to maintain the connection.
Accessing the VM graphically
To access your VM graphically, follow these steps:
- Download and install the X2Go client suitable for the operating system.
- Create a user VM session:
- Launch the X2Go client and create a new session.
- Use the provided host and SSH port received in the email.
- Select ‘XFCE’ as the session type at the bottom of the window. Other session types require manual installation and won’t function out of the box. XFCE is a lightweight desktop environment optimized for virtual machines.
- Change the compression method to ‘4k-png’ on the ‘Connection’ tab to improve the session’s performance.
- After completing these steps, click ‘OK’. You will then be able to log into the VM.
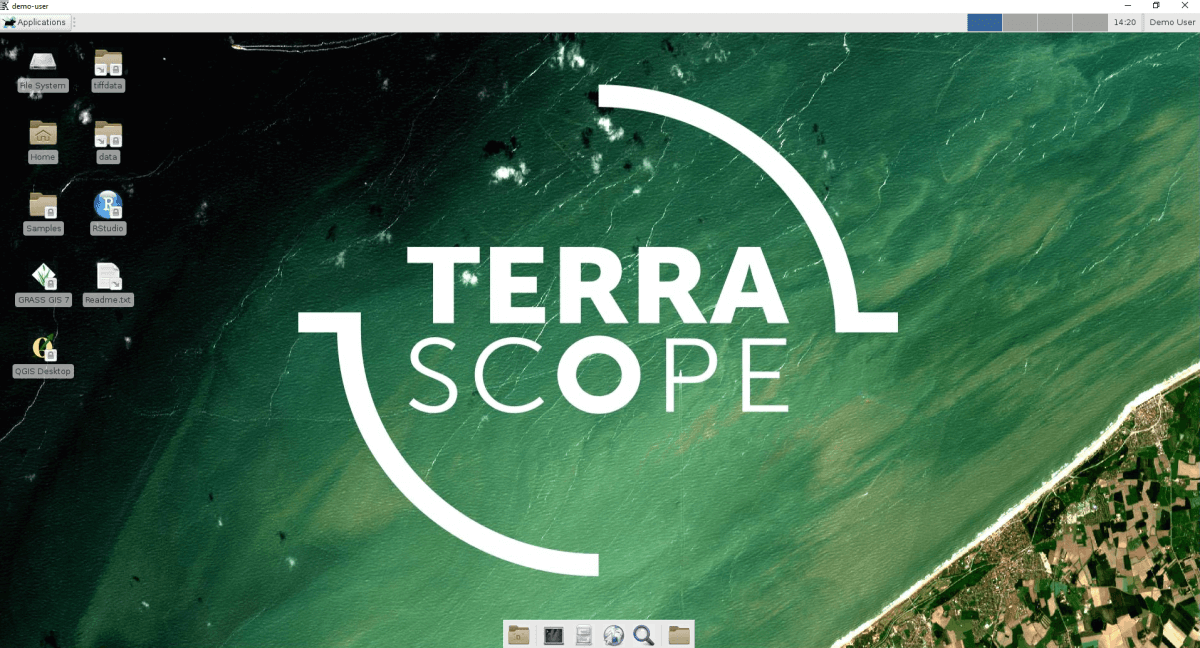
Upon successful login, you will enter a desktop environment that resembles the following image:
If an issue is encountered with session resumption, terminate all sessions and start a new one. This method generally resolves the problems associated with session resumption.
Using SSH key authentication
SSH key authentication offers a more secure login method for accessing VMs than password authentication.
An SSH key pair includes a private key (id_rsa) and a public key (id_rsa.pub). The private key acts like a password and should be kept confidential. To establish a connection, place the public key on your VM.
To use SSH key authentication, an SSH key pair should be created:
- Windows 10: Follow the steps below to generate an OpenSSH key pair.
- Earlier Windows versions: Use PuttyGen for creating a key pair.
Create OpenSSH key pair
Ensure the OpenSSH client is installed to create an OpenSSH key pair in Windows. Verify its installation by navigating to the Settings panel and selecting Apps. Under Apps & Features, locate Manage Optional Features where the OpenSSH Client should be listed. If it is not listed, use the plus sign (+) to add it.
- Open the command prompt by pressing the Windows Key, typing
cmd, and selecting the Command Prompt app. - In the command prompt, type
ssh-keygen. - The key pair will be saved to the default location
C:\Users\your_username\.ssh\, but you can specify a different path if necessary. - Next, the system prompts for a passphrase. Adding a passphrase enhances security in case of a compromised private key.
- If opting not to add a passphrase, press Enter.
- The key pair will be generated at the specified location (or the default
C:\Users\your_username\.ssh\).
Setting up the key pair for authentication
To set up the key pair, copy the contents of the public key to a file on the VM named authorized_keys. This file is located at /home/your_username/.ssh/authorized_keys.
Setting this up via X2GO may only work for some due to potential copy-paste issues between the local machine and the VM. Instead, open an X2GO session using password authentication and navigate to /home/your_username/.ssh/authorized_keys using a file browser. Edit the file by adding the public key’s contents and save it.
Alternatively, this process can be accomplished using the command prompt from the local machine. Follow these steps:
Copy the contents of the public key. Navigate to
C:\Users\your_username\.ssh\using a file browser. Open theid_rsa.pubfile with Notepad (right-click the file → Open with → Notepad), select all text, and copy it.Open the command prompt by pressing the Windows Key, typing
cmd, and selecting Command Prompt.SSH to the VM using the command
ssh -p your_port_number your_username@uservm.terrascope.bein the Command Prompt. Replaceyour_port_numberwith the 5-digit number provided in your VM request email. If using X2GO, find the port number in the session settings (Session management → session preferences) of your X2GO session.Once logged in, carefully execute the following commands:
vi .ssh/authorized_keys- Press
Go, then paste the content usingCtrl + Shift + V(ensure to includeShift). - Save the file by pressing the
Esckey, typing:wq, and pressingEnter.
Now, the public key is added to the VM, allowing you to log in using the key pair.
Setting up Command Line Access to use the key pair
No additional steps are required if the default location was used to store the key pair. Users can continue using Command Line Access as before.
If a custom location was used, include a parameter to specify the private key for the SSH connection.
For example: ssh -i C:\my_ssh_keys\my_private_key -p port username@uservm.terrascope.be
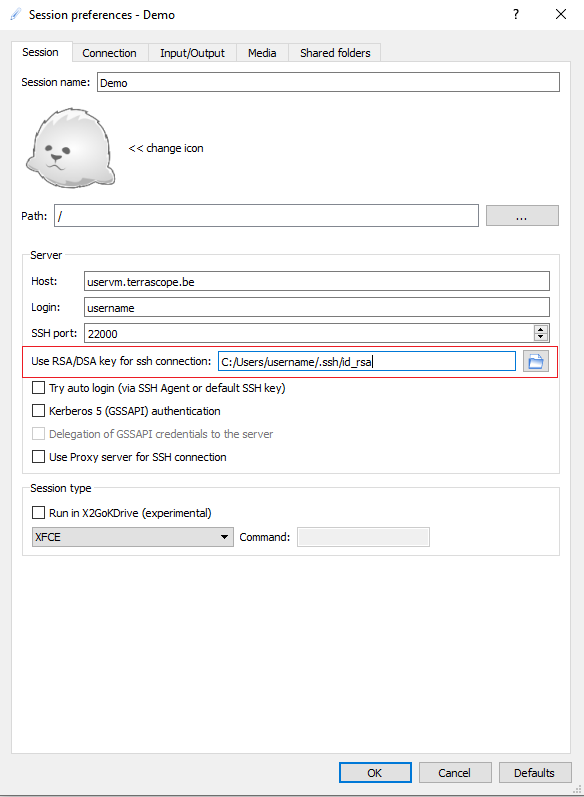
Setting up X2GO to use the key pair
To set up the key pair in X2GO, navigate to the session settings of the VM. Add the private key in the Use RSA/DSA key for ssh connection field.
VM file sharing
For a Windows PC, files can be shared between the VM and a PC directory. Set the PC directory for file sharing as follows:
- Access the X2Go Client screen and click the pencil icon to open the ‘Session Management’ screen.
- Select the VM, navigate to ‘Session Preferences’, and go to the ‘Shared Folders’ tab (refer to Figure 7).
To ensure secure file sharing,
- enable SSH port forwarding for tunnelling file system connections through firewalls
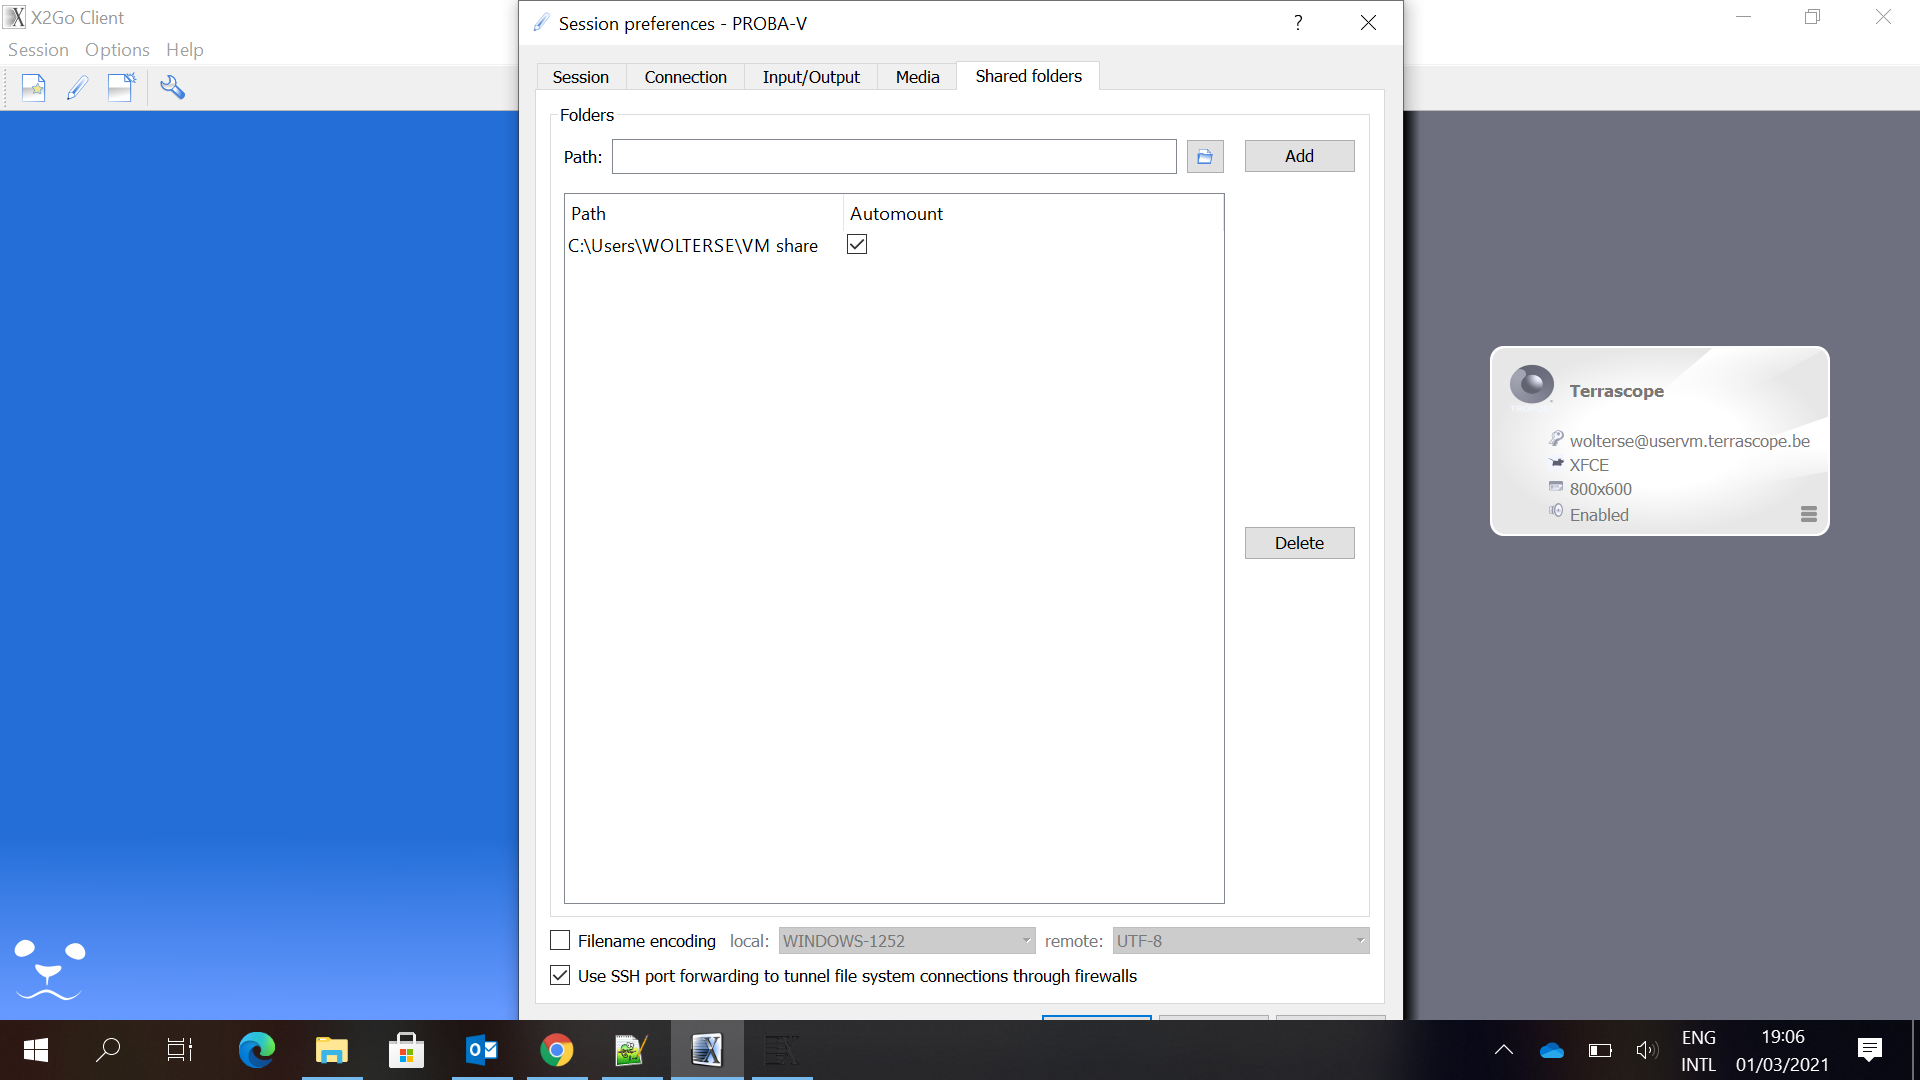
- Browse for and select a directory on your PC
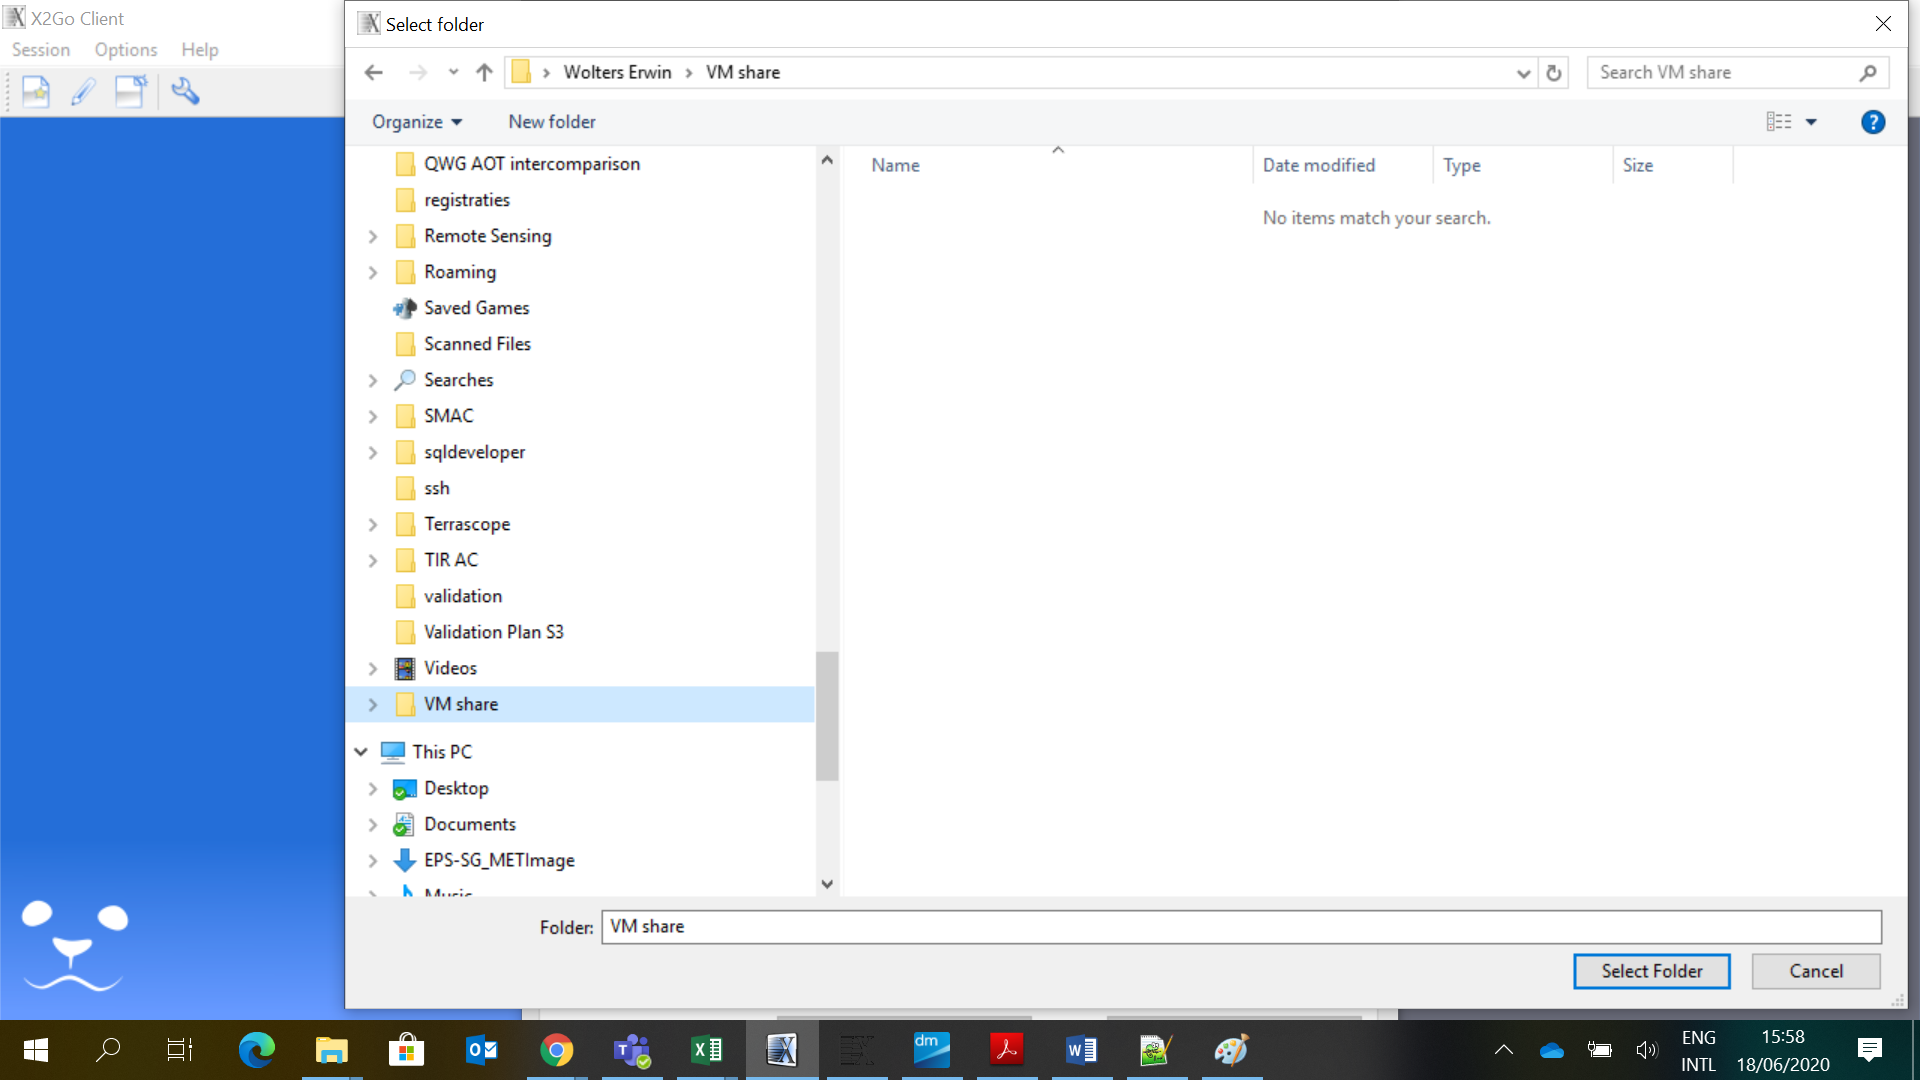
- Click the ‘Add’ button and enable the ‘Automount’ checkbox. This setting automatically makes the PC folder available for file sharing when the X2Go session starts.
Locating the folder where the local folder is mounted on the User VM can be challenging. To find it easily, execute the following command on the User VM:
[wolterse@wolterse ~]$ mount | grep x2go

WOLTERSE@127.0.0.1:/cygdrive/C/Users/WOLTERSE/VMSHAR~1 on /tmp/.x2go-wolterse/media/disk/_cygdrive_C_Users_WOLTERSE_VMSHAR1...
This shows the folder is mounted on /tmp/.x2go-wolterse/media/disk/_cygdrive_C_Users_WOLTERSE_VMSHAR1.
If an issue is encountered with file-sharing support on Windows, consider uninstalling X2Go and reinstalling the latest version for troubleshooting.
Data transfer
The *uservm.terrascope.be endpoint should NOT be used to transfer large datasets (using SFTP, SCP). In case you want to transfer data to or from the Terrascope VM, use an SSH File Transfer Protocol (SFTP) client (such as WinSCP or FileZilla) to connect to SCP endpoint filetransfer.terrascope.be. Visible folders on filetransfer.terrascope.be include /Private and /Public.
Terrascope also offers a dedicated download service to download data from public Terrascope collections.
In case we notice large datasets are being transferred over the uservm.terrascope.be endpoint, data transfer for your VM will be disabled.
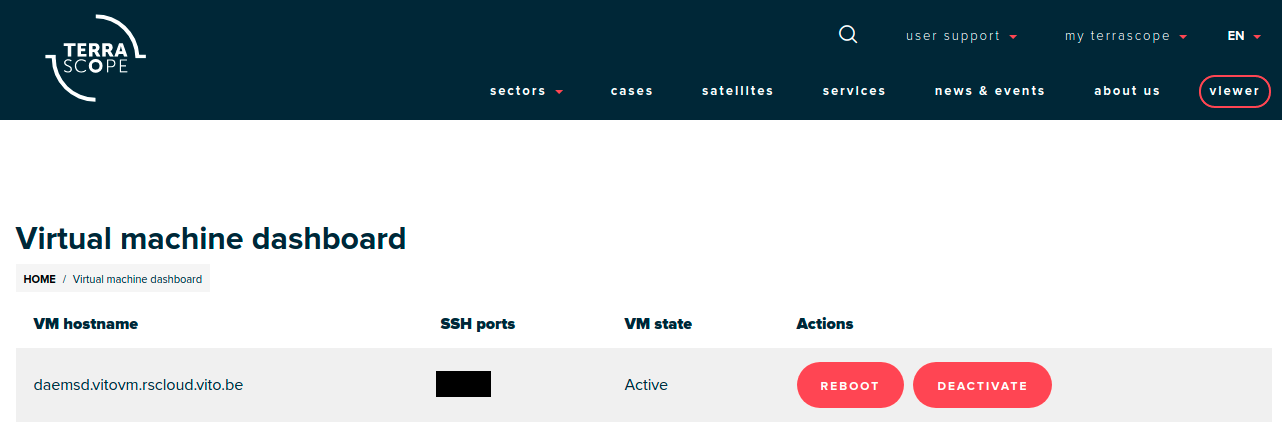
Managing your VM
Users can manage (reboot, activate, deactivate) their VM via the Terrascope portal.
If necessary, to reboot a VM:
- Log in with the Terrascope account.
- Navigate to the ‘My Terrascope’ tab and click ‘My User VMs’.
- A form listing the VM(s) will appear (see figure below). Click the ‘Reboot’ button.
Cleaning VM sessions
Sometimes, previous VM sessions cannot be resumed or terminated using the User Interface. However, these sessions can be cleaned from a VM Linux terminal using the commands x2golistsessions and x2goterminate-session. Refer to the screenshot below:

Only the session ID marked in white on the print screen must be used as input for x2goterminate-session.
Managing bookmarks in Firefox
After an upgrade of Firefox, it’s likely that you end up on a “Welcome to Firefox” / “Firefox Privacy Notice” page. This is only on the first startup, after restarting Firefox the homepage is configured correctly again. You might see that your previous bookmarks aren’t imported automatically as well, while the default bookmarks will always be available:

This is due to the fact that a new profile might have been created. Your old profile is still there, and you can reactivate it with running the command firefox --profilemanager in a terminal:
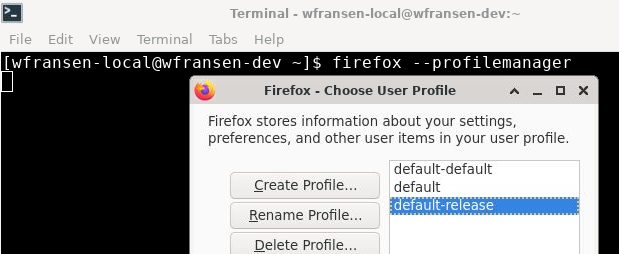
With the current upgrade (v136.0) this will look like the above. If you haven’t created a profile before, your old profile will most likely be default-default. After selecting this and clicking “Start Firefox”, you should see the bookmarks like they were before. At this point you can close and start Firefox the same as usual (assuming you’re using the web-browser icon on your action bar). We recommend renaming your profile, so it’s recognizable with the next upgrade.
GDAL and QGIS
GDAL and QGIS are pre-installed on the virtual machine. QGIS is installed from the AlmaLinux EPEL repository and depends on the system-installed version of GDAL. Since the default GDAL package provided by AlmaLinux lags behind the latest upstream release, newer GDAL versions are made available through Conda. These can be found under ‘/opt/conda’:
$ ls -lsh /opt/conda
total 0
0 dr-xr-xr-x. 12 root root 153 Jul 10 11:45 gdal-3.12.1
0 dr-xr-xr-x. 12 root root 153 Jun 23 13:11 gdal-3.13.1
These conda environments are read-only. You can activate a conda environment to access a specific GDAL version and its features:
$ gdalinfo --version
GDAL 3.10.3, released 2025/04/01
$ conda activate /opt/conda/gdal-3.13.1
(/opt/conda/gdal-3.13.1) $ gdalinfo --version
GDAL 3.13.1 "Iowa City", released 2026/06/01
(/opt/conda/gdal-3.13.1) $ conda deactivate
$ gdalinfo --version
GDAL 3.10.3, released 2025/04/01
As the output from the previous code block indicates, using a specific GDAL version requires a manual step. Adding dependencies to these conda environments isn’t supported.